26th April, 2012
I know 26th April, is a long way from 22nd June, but hey better late than never.
So on the 26th April we had a lesson in basket making, well weaving actually.
We used paper cups and baling twine. Not sure if I have called it the thing there, but its the string that farmers use to tie up their bales of hay. After you know the steps, you can really use what ever you find. I'll post some photo's further down that the lady leading the class has tried. Paper, wire, plastic milk bottles.
So first things first. The show and tell of how to do it.
This was a large milk container that she cut up so we could all see.
Take you string and find the half way point. Move you hand down a bit so that it is no longer even and place over your fist spike as below. The reason for it being uneven is that towards the end of the weaving, both ends wont be finishing in the same spot.
Take the piece of string on the left hand side and bring it across the front of the first spike moving towards the right side. Put the string through the slot above where the other end is coming through and take it around the back of the next spike, bringing it out on the right side of the next spike.
Now take the piece of string that is on the left side and do the same thing as you did with the previous piece. But moving towards the right again.
You continue to alternate between the two pieces moving you way around the container, until you have about 10cm of string left. To add in a new length, put it over the spike that you are up to and then weave both the new and old string at the same time. When you have about 5 cm left on the old string let it stick out and just continue on with the new string. Once you have finished you go back and with a needle thread the sticking out bits under the weave and trim. Sorry don't have photo's for that bit. So always leave the sticking out bits on the outside of the container or it can make it very tricky to tread it through the weaves.
So we used paper cups. Cut the paper cup into strips, but don't go all the way to the base.
Push down on the cup to flatten it out, this helps to be able to wind the string through the spikes.
This is what it will look like.
Our cups had been pre cut, so the first step for us was the flattening.
Then the tricky part of the weaving. You can see that our string is very stringy. The twine is a bit like your cross stick cotton that you only use 2 or 3 strands out of the 6. We untwisted it and used thinner strands.
We decided to change colours.
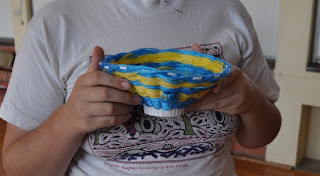
Completed. We were able to change the shape by how tight you pulled on the strings. So this is Miss E and my first attempt.
Master J efforts. He got tricky with his ending bits and instead of just threading them underneath the weaving, used them to make a pattern around his blue bits.
Miss Z effort. You can see here what I am talking about the sticking out end bits. This is before she uses a needle to thread them in behind the weaving.
This is with after she has done the treading.
Looks much neater.
Now these are the other creations from the instructor, just to give you some more example and ideas.


